Data Quality (DQ) Processor using Snowflake
The DQ Processor stage focuses on applying validation rules, identifying data quality issues, and managing issue resolver workflows based on the profiling results and defined constraints.
This topic describes how to create a data quality processor pipeline that reads data from Snowflake, applies data quality rules to validate and resolve identified issues, and writes the processed results back to Snowflake for downstream use.
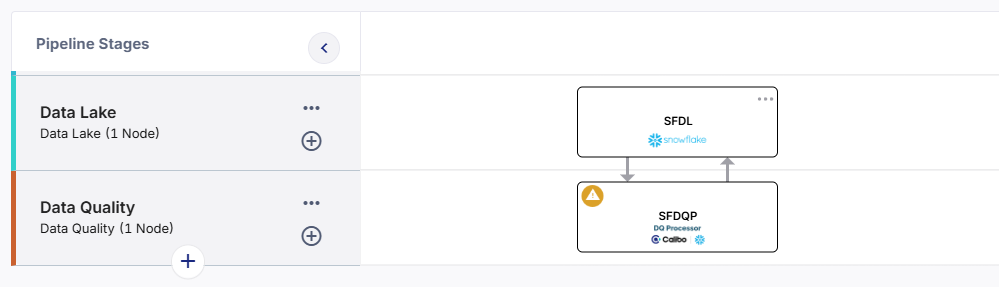
The data quality processor pipeline has the following nodes:
Snowflake (data lake) > Snowflake (data quality node) - DQ Processor
Prerequisites
To create or run a data quality processor job using Snowflake, you must complete the following prerequisites:
-
Get access to a Snowflake data lake configuration listed under Configuration > Cloud Platform Tools & Technologies > Databases and Data Warehouses.
-
Ensure that the Statistics Common Table is configured in the Snowflake instance to store statistical data and metadata information.
To create a data quality processor job
-
Sign in to the Calibo Accelerate platform and navigate to Products.
-
Select a product and feature. Click the Develop stage of the feature and navigate to Data Pipeline Studio.
-
Add the Data Lake stage > Snowflake node, then configure the data lake node.
-
Add the Data Quality stage > Snowflake > DQ Processor node.
-
Connect the data lake and data quality nodes to each other.
-
Click the data quality processor node and complete the following steps to create a data quality processor job:
 Job Name
-
Template - Based on the source and destination that you choose in the data pipeline, the template is automatically selected.
-
Job Name - Provide an appropriate name for the data quality processor job.
-
Node Rerun Attempts - Specify the number of times the pipeline rerun is attempted on this node of the pipeline, in case of failure. The default setting is done at the pipeline level. You can change the rerun attempts by selecting 1,2, or 3.
-
Fault tolerance - Define the behavior of the node upon failure, where the descendent nodes can either stop and skip execution or can continue their normal operation. The available options are:
-
Default - If a node fails, the subsequent nodes go into pending state.
-
Proceed on Failure - If a node fails, the subsequent nodes are executed.
-
Skip on Failure - If a node fails, the subsequent nodes are skipped from execution.
For more information, see Fault Tolerance of Data Pipelines.
-
Click Next.
Source
-
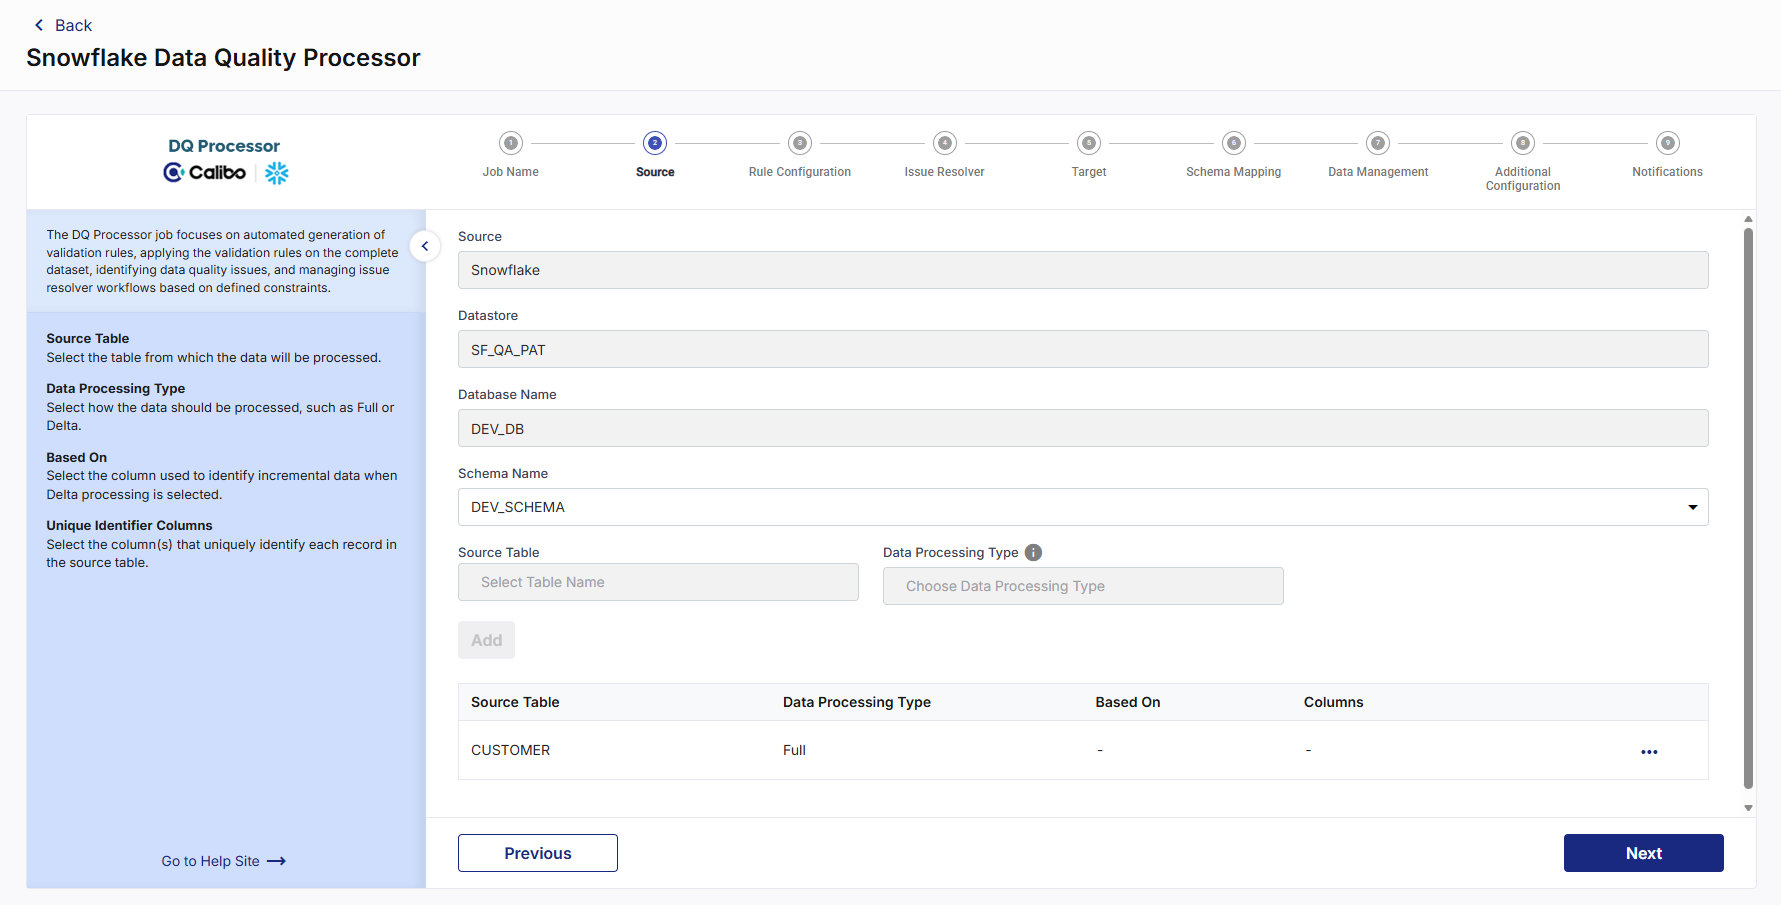
Source - This is automatically selected depending on the data lake node configured and added in the pipeline.
-
Datastore - The configured datastore that you added in the data pipeline is displayed.
-
Database Name - The database which is associated with the configured datastore is displayed.
-
Schema Name - The schema associated with the database is displayed. The schema is selected based on the database, but you can select a different schema.
-
Source Table - Select a table from the selected datastore.
-
Source Format - You can either select Parquet or Delta table.
-
Data Processing Type - Select the type of processing that must be done for the data. Choose from the following options:
-
Delta - In this type of processing, incremental data is processed. For the first job run, the complete data is considered. For subsequent job runs, only delta data is considered.
-
Based On - Select Table Columns from the dropdown and select a column (or set of columns) from the Unique Identifier Columns dropdown.
-
-
Full - In this type of processing, the complete dataset is processed in each job run.
-
Click Next.
Rule Configuration
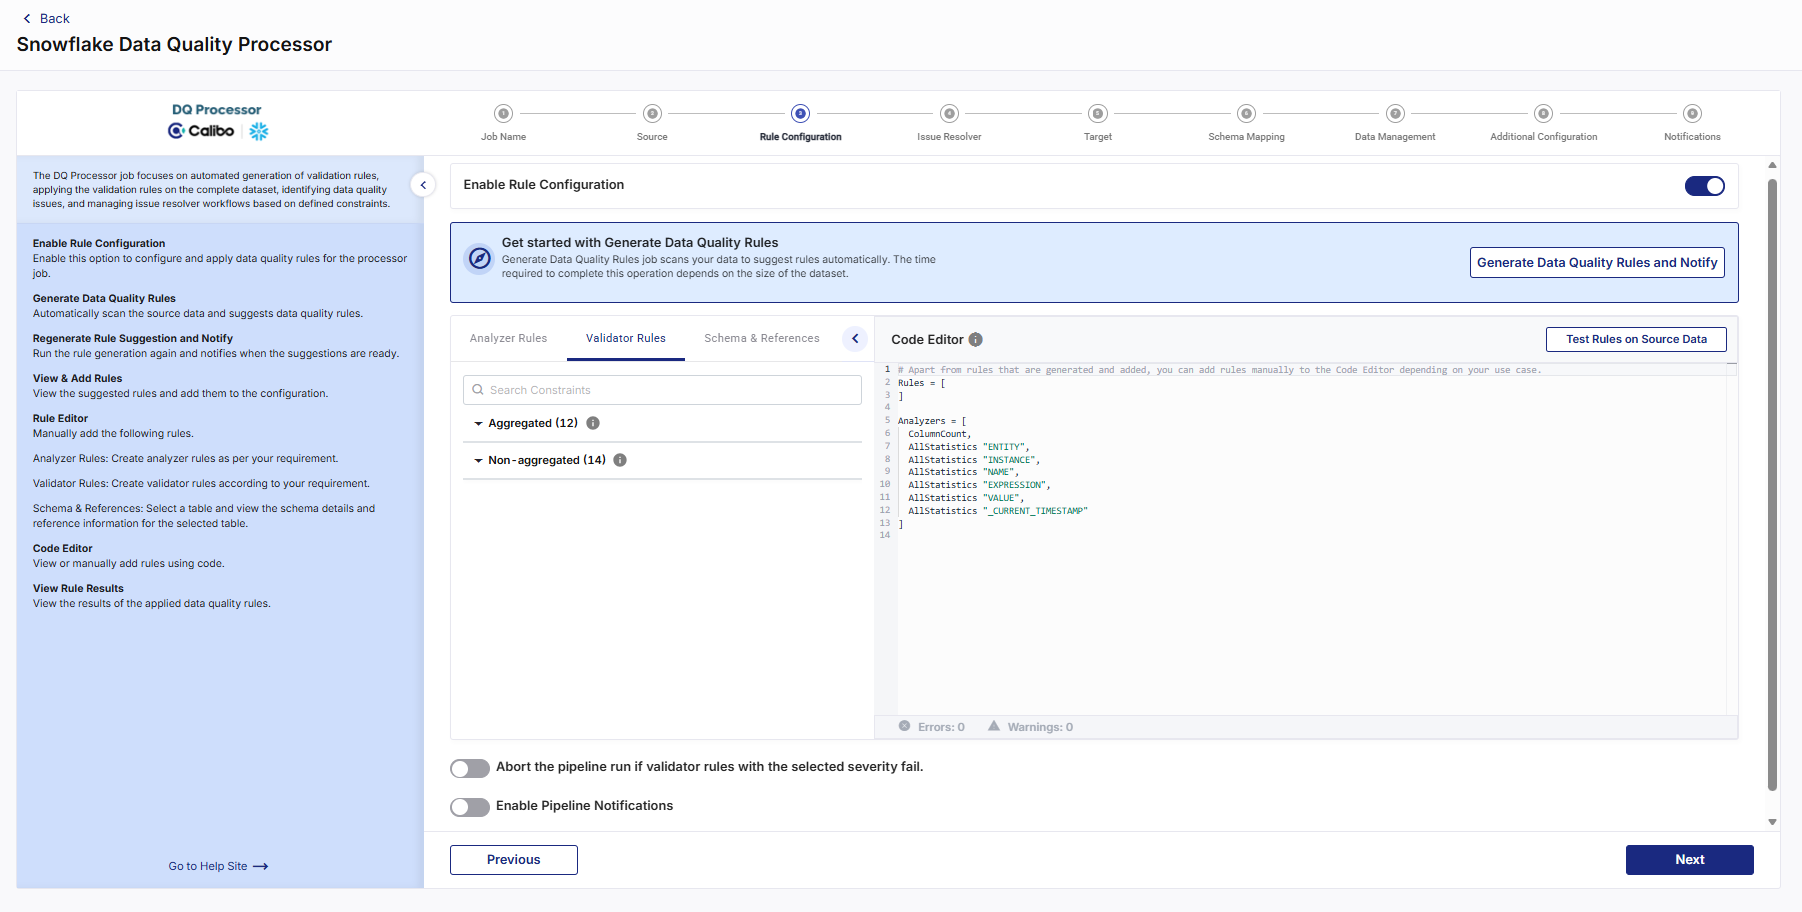
This is an optional step if you want to add rules and run validation. To configure rules, do the following:
-
In the Rule Configuration step, enable the Enable Rule Configuration option. Enabling Rule Configuration allows you to define, test, and apply data quality rules to the selected dataset.
-
In the Get started with Generate Data Quality Rules or Go to Code Editor section, click Generate Data Quality Rules and Notify. The Run Rule Suggestions popup opens.
You can do one of the following:
-
Run the Generate Data Quality Rules job on the full dataset.
-
Enable Apply Filter to choose fields, operators, and values and preview the filter details. You can construct complex filter conditions using AND/OR combinations, validate the filter query, and apply SQL WHERE clause filters to limit the dataset used for generating and validating rules.
-
Enter a number in Limit the records (Optional) to reduce the data size.
-
-
Select Send me an email when rule generation is complete, then click Generate Rules & Notify.
The Get started with Generate Data Quality Rules section displays the progress bar when the Generate Data Quality Rules job is initiated, a confirmation message is displayed, and email notifications are sent once the rule generation is completed successfully.
-
You can click the Refresh icon to check the status or click Cancel to terminate the initiated job.
-
To regenerate data quality rules and notify users of the results, you can click the Regenerate Rule Suggestion and Notify option.
-
If rules were previously generated, this section displays Last Run Status and Completed On date and time.
The dataset is analyzed and recommended data quality rule suggestions are generated based on data patterns and profiling insights.
-
Click View & Add Rules. The Add Rule Suggestions popup opens.
-
From the Select Completed Run Suggestions to View dropdown, select the completed job from the available list as needed.
-
Review the list of generated rules and select the required rules based on your data quality requirements.
Tip: You can choose only the rules relevant to your use case and ignore others.
-
Select a severity level (Low, Medium, High) from the dropdown for each chosen rule. Severity indicates the rule’s importance and is used during data quality evaluation and pipeline processing.
-
Click Add to add the selected rules to the configuration.
For validating or troubleshooting rule generation outcomes, you can do the following:
-
From the ellipsis, click View Run Details to review following execution details in the Rule Generation Run Details popup:
-
Total Runs
-
Ongoing Runs
-
Cancelled Runs
-
Failed Runs
-
Successful Runs
-
-
Rule Generation Run History including Filter Criteria, Status, Start Time, End Time, Run Duration, and Rule Output, where you can copy the generated rules.
-
To add or modify rules manually using code editor, do the following:
-
In the Code Editor section, edit the rules using supported rule syntax and check for Errors/Warnings, then click Test Rules on Source Data to validate rules. The Do you want to run rules on the actual dataset? popup opens.
Alert: Resolve errors before proceeding to ensure successful validation.
-
-
In the popup, you can do either of the following:
-
Run rules job on the full dataset.
-
Enter a percentage in the Limit the records to process by specifying a percentage textbox to reduce the data size.
-
-
Select Send me an email when the rule execution is complete, then click Yes.
The Code Editor section displays the progress bar when the Data Quality Run validation job is initiated, and a confirmation message is displayed once the validation runs successfully.
Note: You can click the Refresh icon to check the status or click the Stop icon to terminate the initiated job.
-
Click View Rule Results to review the following validation details in the Results popup:
-
Percentage of records processed
-
Analyzer tab including details of analysed rules
-
Rules (Validator) tab including Rules, Result (Pass/Fail), and Result Details.
-
-
To define and apply validation rules that ensure data accuracy based on specific constraints, do the following:
-
In the Validator Rules tab, use Search Constraints to locate the required validation rules, or browse through the following categories:
-
Aggregated - Constraints applied on grouped or summary data.
-
Non-aggregated - Row-level constraints applied to individual records.
-
-
Select the required validator rules and severity (Low, Medium, High) as applicable, apply filters if needed, then click Add. The selected validator rules appear in the Code Editor section.
Note: When applying a filter, you can select the field, choose an operator, enter a value, and preview the filter details. Additionally, you can restrict the dataset used for rule validation by applying SQL WHERE clause filters directly. This allows you to validate only a specific subset of the data based on custom filtering conditions.
-
To configure analyzer rules that help assess data health including data characteristics and statistics, do the following:
-
Click the Analyzer Rules tab, use Search Constraints to locate specific analyzer rules.
-
Select the required analyzer rules. A popup opens.
-
Turn on Anomaly or Enable Auto-Anomaly option to enable anomaly detection for the selected analyzer rules.
-
You can enable anomaly detection for each rule individually or for all rules simultaneously.
-
Anomaly settings are not considered when you click Test Rules on Source Data.
-
Anomaly detection is evaluated only during DQ Processor pipeline execution.
-
The anomaly detection model requires sufficient historical execution data before anomaly predictions become available.Enter an anomaly Weightage value to indicate the relative importance of the analyzer metric during anomaly evaluation. Anomaly weightage determines the relative importance assigned to an analyzer metric during anomaly evaluation.
-
Higher values increase the contribution of the metric during anomaly scoring.
-
Lower values reduce the contribution of the metric.
-
If you do not specify a weightage, the system uses the default weightage during anomaly calculations.
-
-
-
Click Add. The selected analyzer rules are added to the Code Editor section with anomaly detection settings.
Example: Completeness "trade_id" with Anomaly = “true” with Anomaly_weightage = “0.5”
In the Code Editor, analyzer rules configured for anomaly detection display:
-
Rule name
-
Column name (if applicable)
-
Anomaly enabled status
-
Anomaly weightage value (when specified)
-
To add schema and reference tables that help validate data against a master dataset with predefined list of allowed values, do the following:
-
Click on the Schema & References tab, use Search Schema to locate available schemas or reference tables.
-
Click Add Reference Table to include a reference table for validating data against external or master datasets. The selected schema and reference tables appear in the Code Editor section. For more information, refer to Understanding Schema and Reference Tables.
-
In the reference table side drawer, click Updates Available to view column additions or deletions and update the reference table accordingly. When modifying reference table entries, the system performs usage validation to ensure that these changes do not break existing configurations or dependent data quality rules.
-
If a referenced value is used in rules or mappings, an alert message displays before allowing the update or deletion.
-
Only safe, non breaking changes are permitted, ensuring the integrity of all dependent DQ rules and validations.
-
-
-
Enable the Abort the pipeline run if validator rules with the selected severity fail option to stop the pipeline execution when validation rules fail. This option ensures only validated data is processed in the pipeline.
-
To send the pipeline success or failure notifications, enable the Enable Pipeline Notifications option, select either Failures only or Both Success and Failure, then select the severity levels from the Failures for selected severities dropdown as required.
Click Next.
Issue Resolver
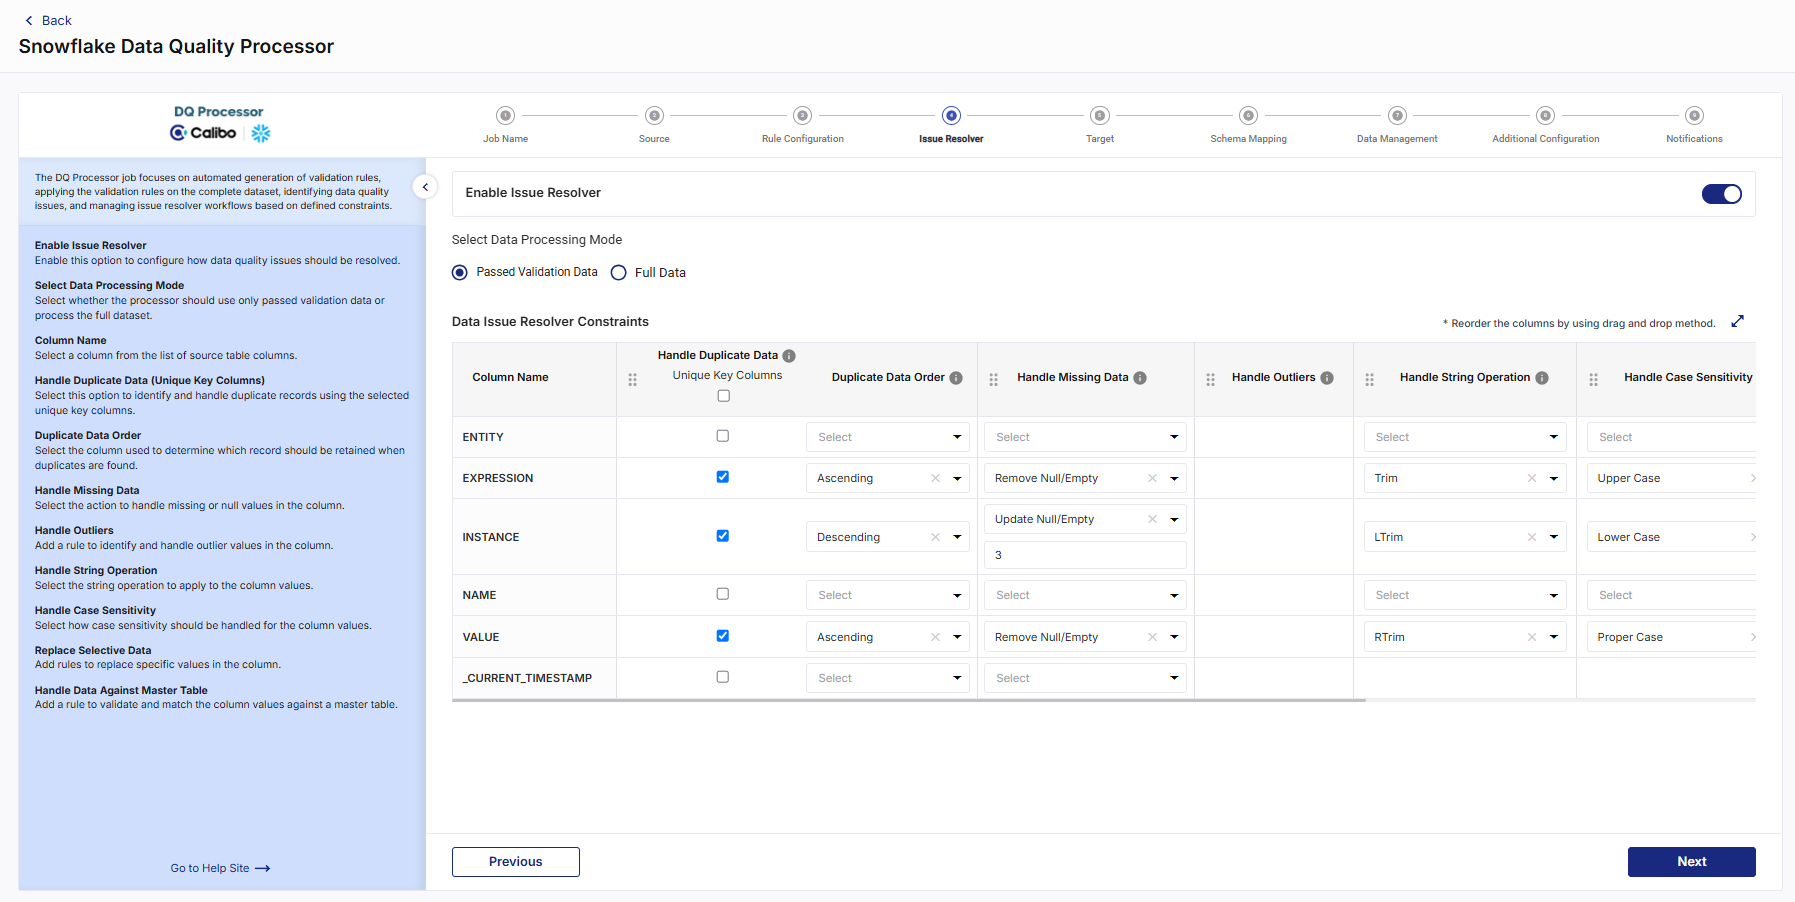
To apply automated data handling constraints and resolve issues, do the following:
-
In the Issue Resolver step, enable the Enable Issue Resolver option. This allows you to apply automated rules to resolve issues during data processing.
-
From Select Data Processing Mode, choose one of the following:
-
Passed Validation Data - Applies issue resolver only to records that passed validation.
Note: This option is available only if the Enable Rule Configuration option is enabled in the Rule Configuration step.
-
Full Data - Applies issue resolver to all records.
Tip: Choose the mode based on whether you want strict or inclusive processing.
-
-
To configure data issue resolver constraints that determine how specific data quality issues are automatically handled during processing, do the following:
-
In the Data Issue Resolver Constraints section, configure column-level issue handling using the following options:
-
Column Name - Displays the column being configured to which issue resolution rules are applied.
-
Handle Duplicate Data - Define how duplicate records are detected and resolved for the column.
-
Unique Key Columns - Select columns that uniquely identify records for duplicate detection.
-
Duplicate Data Order - Specify the ordering logic used for resolving duplicate records.
-
Handle Missing Data - Define how null or empty values should be handled for the column.
-
Handle Outliers - Configure rules to identify and resolve outlier values in the column.
-
Handle String Operation - Apply string-level transformations or cleanup operations on column values.
-
Handle Case Sensitivity - Define how case sensitivity should be handled for string comparisons or values.
-
Replace Selective Data - Configure rules to replace specific values in the column.
-
Handle Data Against Master Table - Validate or resolve column values using a master reference table.
-
-
Drag and drop to change the execution order of constraint columns.
-
-
Review all configured issue resolution rules. Once configured, validation rules assess data quality, issue resolver rules automatically handle detected issues, and clean, validated data is written to the configured target tables.
Click Next.
Target
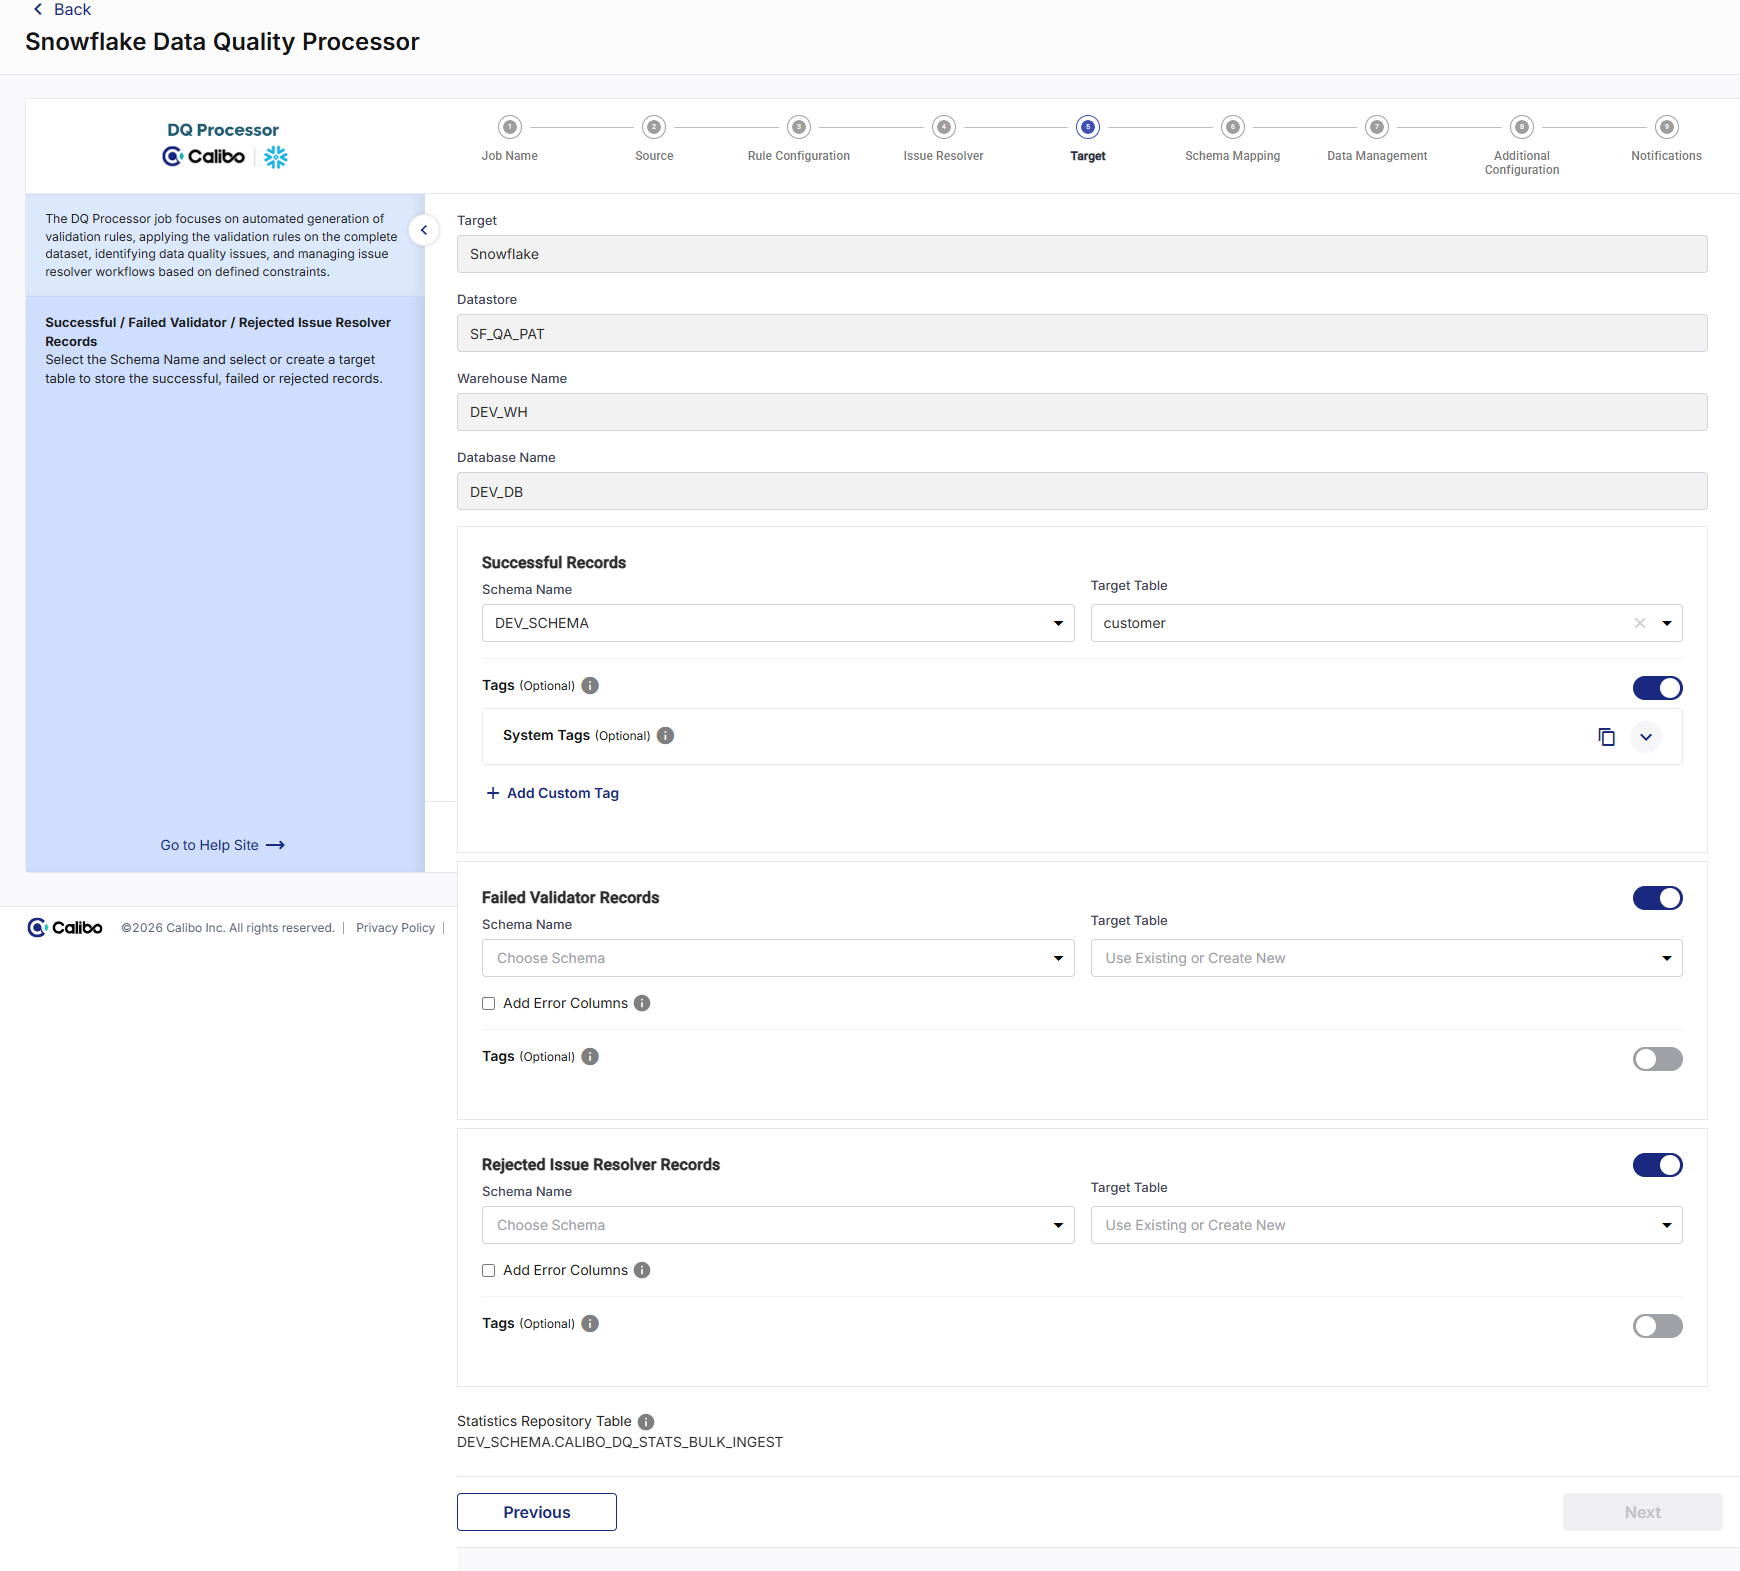
This step defines where processed data and data quality outcomes are written after validation and issue resolution.
-
In the Target step, review the following:
-
Target - This field is automatically populated, depending on the target node configured and added in the pipeline.
-
Datastore - This field is automatically populated, depending on the target node configured and added in the pipeline.
-
Warehouse Name - The warehouse that is associated with the configured datastore is displayed.
-
Database Name - The database that is associated with the configured datastore is displayed.
These fields determine the logical storage location for all target tables.
-
-
To define where records that pass validation and issue resolution are written:
-
Under Successful Records do the following:
-
Select Schema Name for successful output records.
-
Select or enter the Target Table name where successful records will be stored.
-
-
Successful records typically represent clean, compliant data ready for downstream consumption.
-
To capture records that fail validation rules, enable the Failed Validator Records option and do the following:
-
Select Schema Name for failed validator records.
-
Select or enter the Target Table name where failed validator records will be stored.
-
Note: Select the Add Error Columns checkbox to create an additional column in the output table to log validation errors for failed or rejected records.
-
To store records that are rejected during issue resolution, enable the Rejected Issue Resolver Records option and do the following:
-
Select Schema Name for rejected records.
-
Select or enter the Target Table name where rejected issue resolver records will be stored.
-
Note: You can select the Add Error Columns to create an additional column in the output table to log validation errors for failed or rejected records.
-
Statistics Repository Table - Displays the statistics repository table configured for the selected Snowflake instance. This table is used for monitoring, auditing, and reporting data quality trends.
After completing the Target step, clean records are written to designated target tables, failed and rejected records are optionally stored for analysis, and data quality statistics are captured for monitoring and governance.
Click Next.
Schema Mapping
-
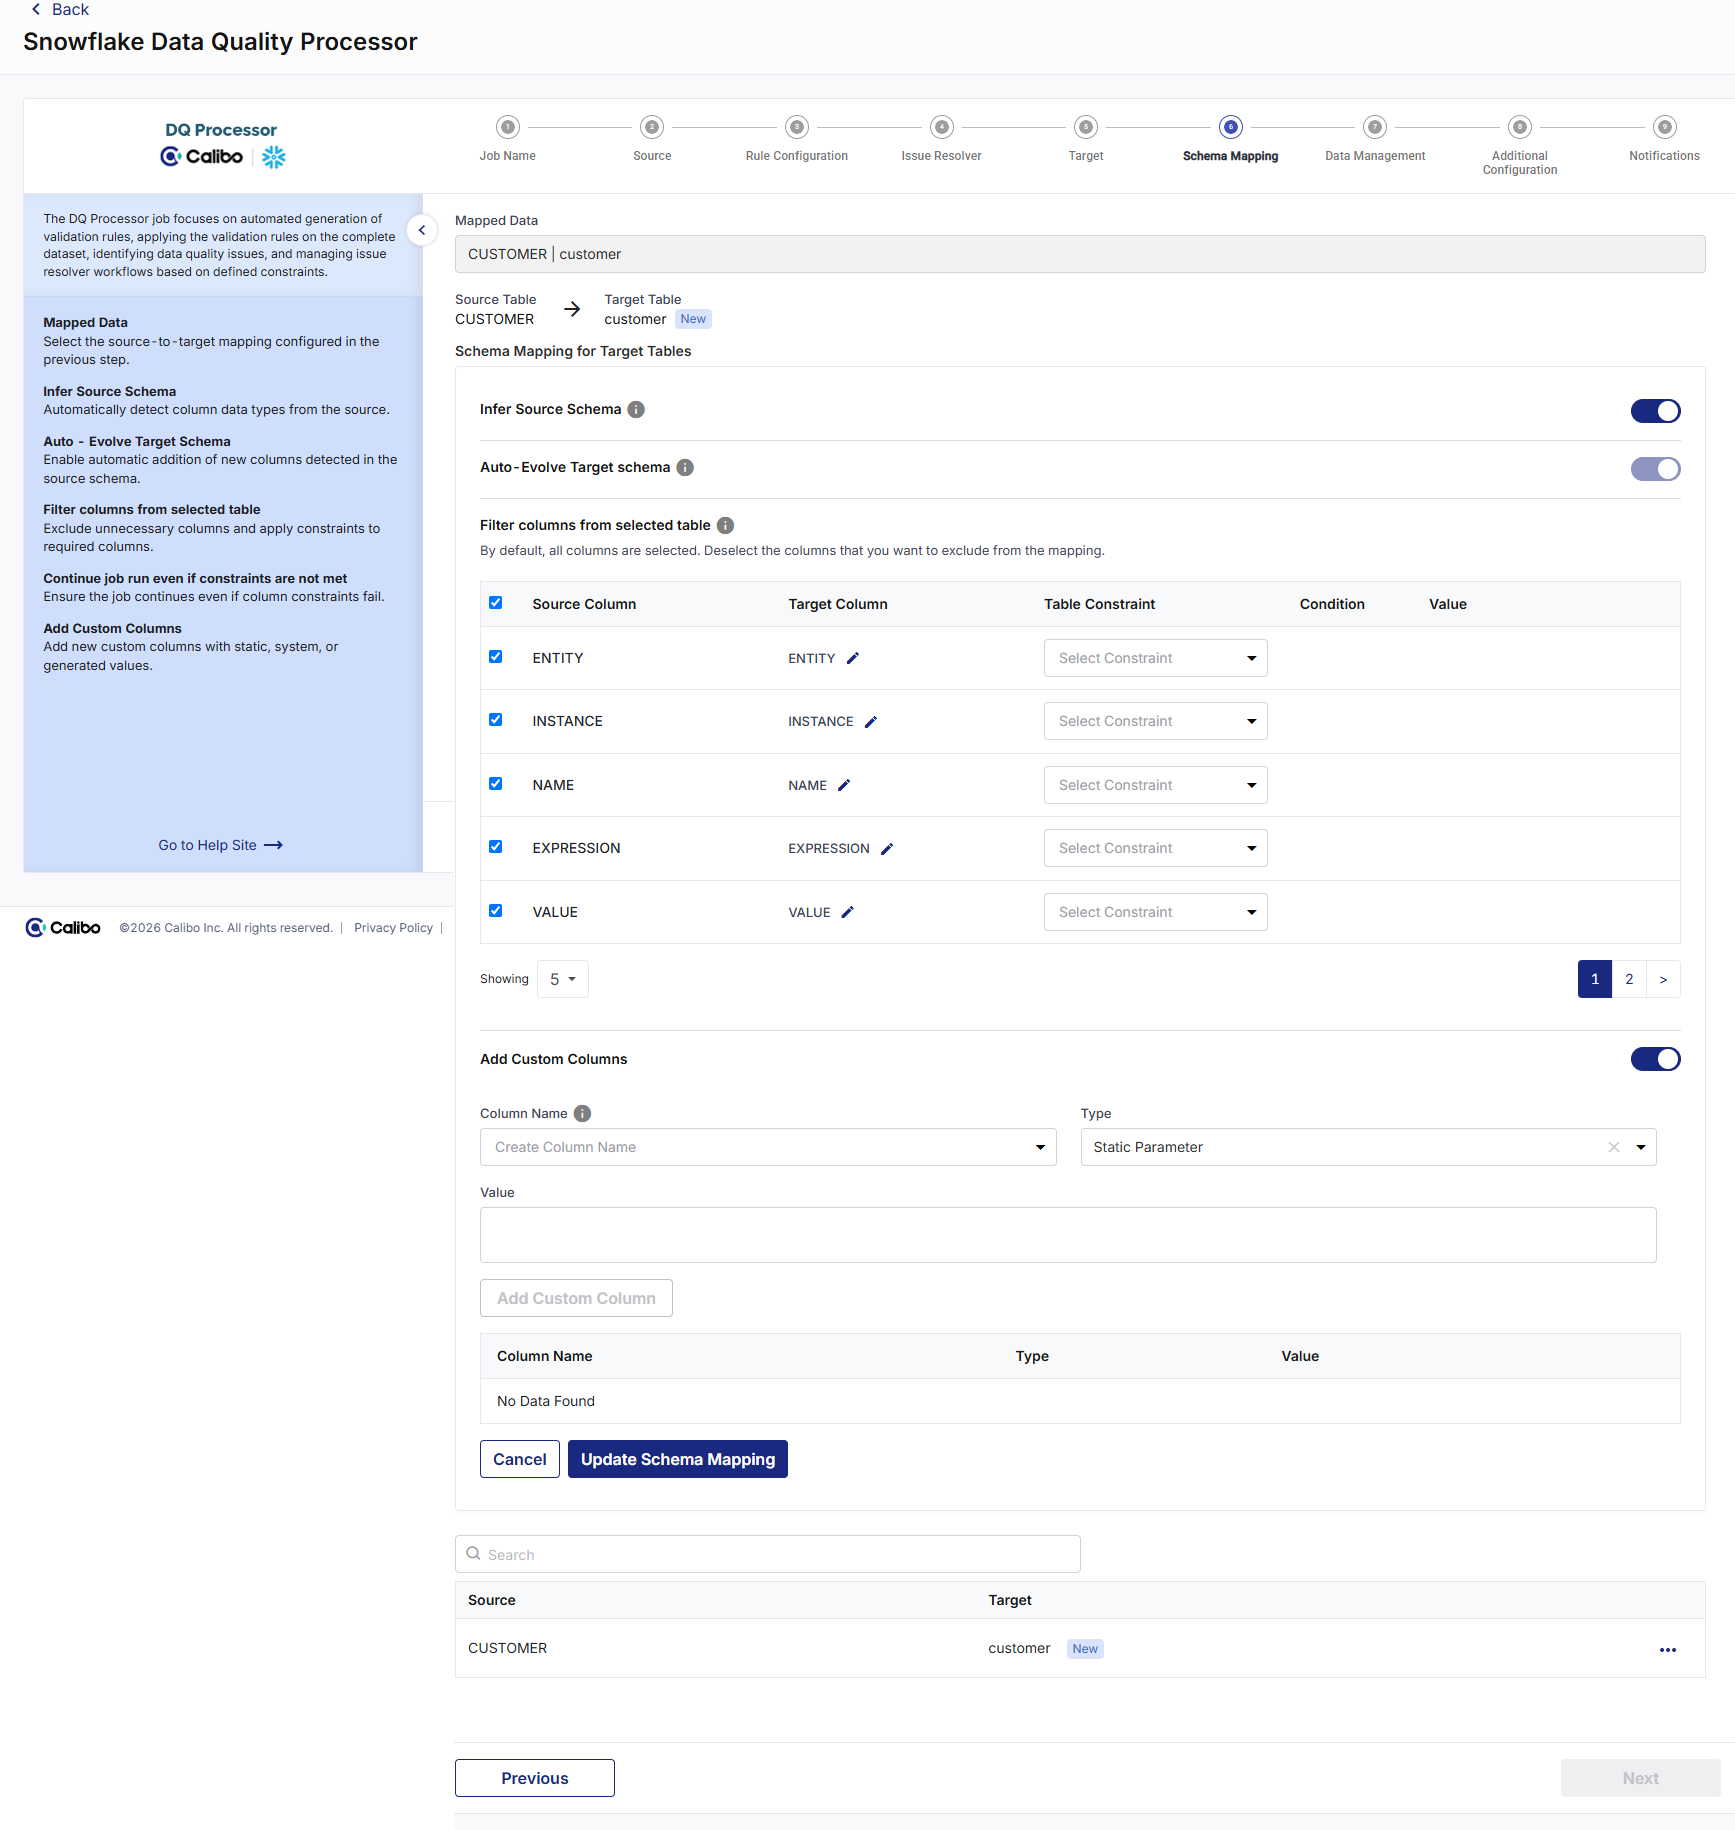
In this step you provide schema mapping details for all mapped tables.
-
To provide schema mapping details, do the following:
-
Mapped Data - Select the mapping of the source file with the target table configured in the previous stage.
-
Infer Source Schema - This option lets you identify the schema of columns with data types automatically.
Note: If this setting is turned off, you can manually edit the data types of source columns.
-
Auto - Evolve Target Schema - This option lets the integration job automatically update the target table by adding any new columns detected in the source schema.
-
Ignore New Columns - Enable this option to skip newly added columns and run the pipeline successfully.
-
Filter columns from selected table - Deselect columns you want to exclude from the mapping, configure constraints for required fields, or secure PII for columns containing sensitive information.
-
Deselect any columns that are not required from the auto populated list and assign custom names to columns where needed.
-
Apply constraints by selecting one of the available options:
-
Set Not Null
-
Check - for this constraint, you must provide a valid SQL condition and specify the value to be checked for the selected column.
-
-
-
Add Custom Columns - Enable this option to add additional columns apart from the existing columns of the table. To add custom columns, do the following:
-
Column Name - Provide a column name for the custom column that you want to add.
-
Type and Value - Select the parameter type for the new column. Choose from the following options:
-
Static Parameter - Provide a static value that is added for this column.
-
System Parameter - Select a system-generated parameter from the dropdown list that must be added to the custom column.
-
Generated- Provide the SQL code to combine two or more columns to generate the value of the new column.
-
-
-
Click Add Custom Column after adding the details for each column.
-
Repeat steps 1-3 for the number of columns that you want to add. After adding the required custom columns, click Add Schema Mapping.
-
To review the column mapping details, click the ellipsis (...) and click View Details.
-
Note: You can use the Edit or Delete options to modify or remove the details.
Click Next.
Data Management
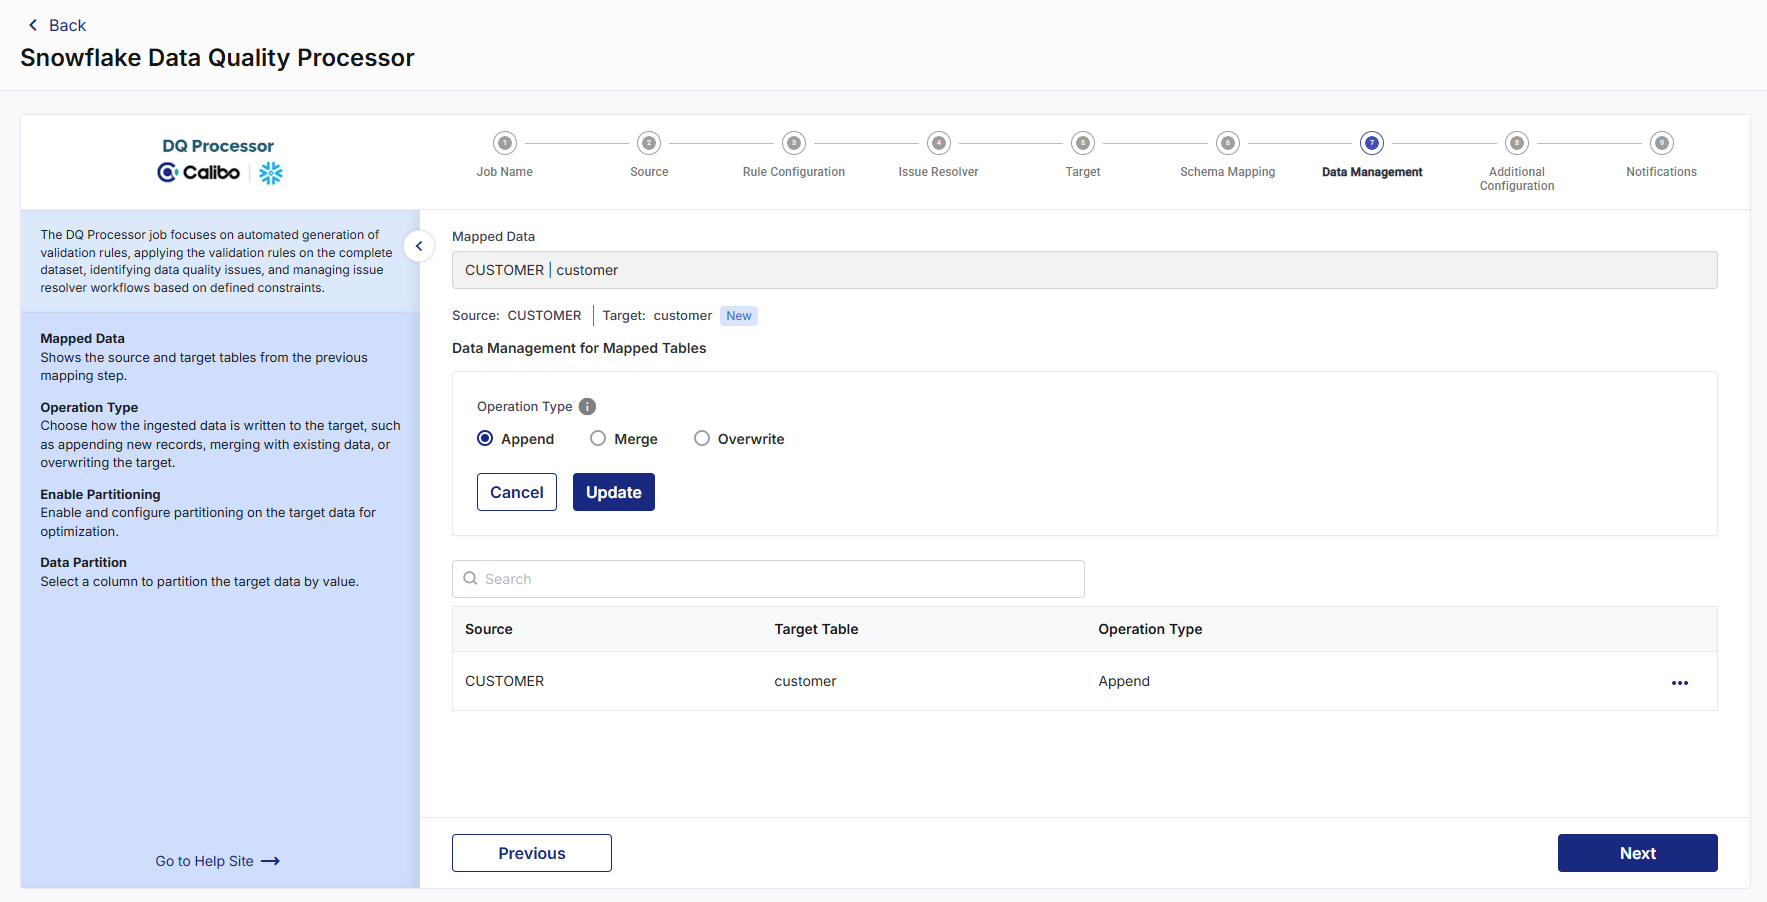
In this step you select the operation type that you want to perform on the source table and the partitioning that you want to create on the target table.
-
Mapped Data - Select the mapping that you performed in the previous step. The source table and target table details are provided.
-
Operation Type - Select the operation type to perform on the source data. Choose one of the following options:
-
Append - Adds new data at the end of a file without erasing the existing content.
-
Merge - Adds data to the target table for the first job run. For each subsequent job run, the data from the target table is merged with the change in source data.
-
Overwrite - Replaces the entire content of a file with new data.
-
-
Click Add. The Data mapping for mapped tables displays the mapping details.
-
Click the ellipsis (...) to edit or delete the mapping.
Click Next.
Additional Configuration
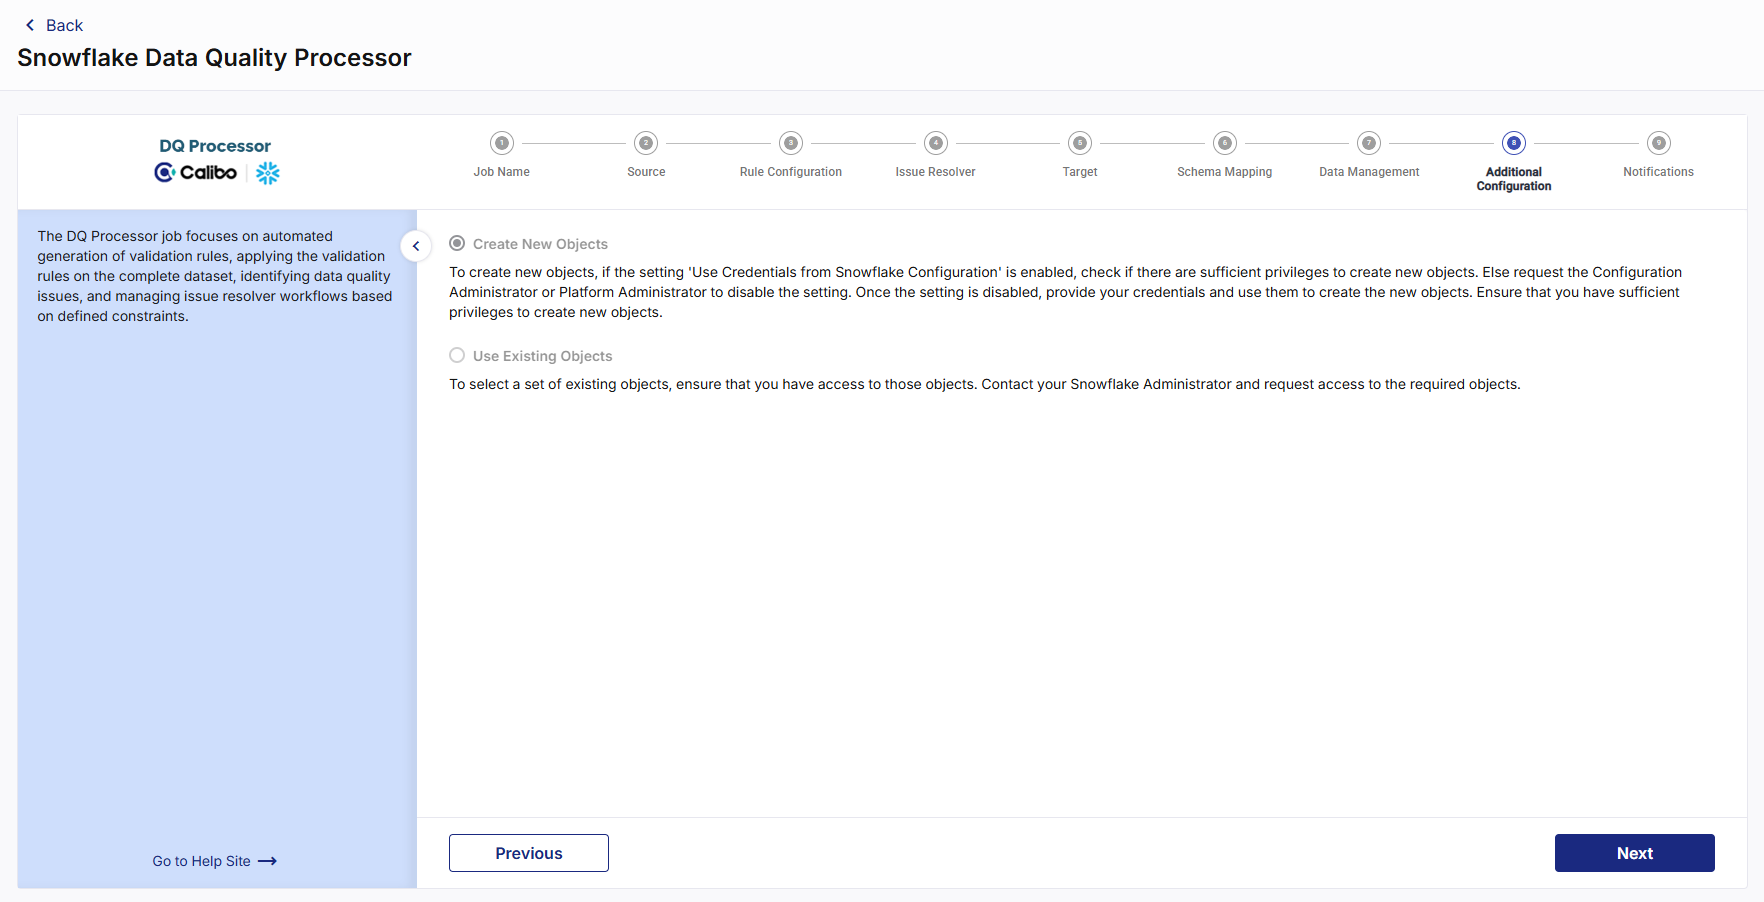
In the Additional Configuration step, you can select one of the options below:
-
Create New Objects - Select this option to create new objects. Ensure that the configured or provided credentials have the required permissions to create objects.
-
Use Existing Objects - Select this option to use existing objects. Ensure that you have access to the selected objects. Contact your Snowflake Administrator if additional permissions are required.
Click Next.
Notifications
You can configure the SQS and SNS services to send notifications related to the node in this job. This provides information about various events related to the node without connecting to the Calibo Accelerate platform.
SQS and SNS Configurations - Select an SQS or SNS configuration that is integrated with the Calibo Accelerate platform. Events - Enable the events for which you want to enable notifications:
-
Select All
-
Node Execution Failed
-
Node Execution Succeeded
-
Node Execution Running
-
Node Execution Rejected
Event Details - Select the details of the events from the dropdown list, that you want to include in the notifications. Additional Parameters - Provide any additional parameters that are to be added in the SQS and SNS notifications. A sample JSON is provided, you can use this to write logic for processing the events. -
| Recommended Topics
|
What's next?Databricks Templatized Data Integration Jobs |